How To Make Plush Toys
Published :
03/23/2020 11:00:14
Categories :
Video tips from pediatricians
If you have young children, you certainly often buy them plush toys. When you buy them, you are usually guided by the child’s preference of toys, the brand of the children's product, and its quality. This is completely logical because you are parents who want to buy the most beautiful and best quality plush toy for their child.
But do you know what manufacturing processes soft toys go through before you buy them from the store and give them to your child? If you are curious about how stuffed toys are made, let’s look at the basic processes involved in stuffed toy production.
How are plush toys made?
Manufacture of soft toys - from idea to production
Marketing research
There are no products that begin production without a thorough marketing study.
Manufacturers of plush toys start the study a few months in advance, and the marketing departments study and analyse the market. This study usually includes:
● analysis of the competition and consumer attitudes
● market niches
● the age group for which the soft toy is intended, etc.
It the marketing department’s job to provide suggestions for the distribution and delivery of toys as well as to develop an advertising strategy for a campaign to promote the finished product.
Product design
Once the initial data from the marketing survey is analysed, it is the turn of the creative design department to develop the plush toy design. This is probably one of the most important steps in making plush toys because when designing a product design, designers need to create a toy that is not only beautiful, colourful, and fun, but also a toy that fits the age of the children for whom it is intended.
Initially, the idea of what a toy should look like is presented as a sketch or 3D computer model. This model is presented to the marketing and production department and, if approved, the designers move on to the next stage in the development of the soft plush toy - prototype creation.
Prototype making
Creating an example model of a plush toy is another important step, because thanks to it the manufacturers can get a real idea of what the toy will look like when finished. The prototype is usually made of materials that will be used in the production of the whole series of plush toys, if the model is approved. Before starting production, the final price of the product is calculated, and once this stage is completed, it moves on to the production of plush toys.
Manufacturing technology or how to make plush toys?
After all the preliminary studies have been completed and the design is approved, the model goes into production where the production of plush toys begins.

Cutting the material for making soft toys
In this first stage of production, the fabric from which the toys will be made is cut into the required sizes and shapes. Cutting is done with the help of special machines or with laser cutting machines.
Sewing a plush toy
Once all the fabric is cut, the pieces of fabric go to the sewing department. This stage of making plush toys is entirely manual and is carried out by workers who sew the basic components of the toys with the help of professional sewing machines.
Once the basic components of the soft toy are sewn, if the design includes additional elements like embroidery, the toys are embroidered before the next stage of production begins. Embroidering is usually done with fully automated machines and does not take much time. If the design does not have any additional elements, the toys move on to the next stage of production.
Toys stuffing
All plush toys are filled with extra material (stuffing) to give them the desired volume. What the filler will be is determined at the beginning of the project, but most often manufacturers choose synthetic materials such as chlorofibre, polyurethane foam, or plastic pellets for higher quality and expensive toys and cotton for their cheaper products.
Filling is an automated and relatively simple process because it is important that the toys are filled evenly in order to obtain the desired shape.
Combining the components of the soft toys
This is the stage in which the rest of the components (legs, arms, head, tail, etc.) are sewn onto the main body of the toys. This is a very important stage that requires high levels of skilfulness. When connecting the different parts, it is important that the seams are made precisely and very professionally, so only tailors with many years of experience are involved at this stage.
Finishing the toys
After the soft toys are almost completely finished, the eye, hair, mouth, and other accessories are sewn or embroidered to the toys to complete the product.
Internal quality control
Each company that manufactures soft toys has an internal control department that is responsible for quality control. The inspection includes both a visual inspection checking for uniformity of the shape and dimensions of the toys, as well as tests to check the seams, the strength of the sewn or glued accessories, and so on.
Quality control experts monitor any irregularity and, if found, defective toys are removed from the batch. In addition to internal quality control, major manufacturers also rely on independent inspections to make sure that the toys they manufacture are truly of high quality and completely safe for children.
Tests and certification
All soft toys (as well as the raw materials they are made of) are required to undergo several basic safety tests before being certified CE. Testing is carried out in certified laboratories where the toys are subjected to a physical strength test, a fire test, a heavy metal test, and more.
Labelling and packaging
The last two steps in the production of plush toys are the labelling of each piece and packaging. Labels should be placed in a prominent place and must indicate which age children the toy is intended for, name of the manufacturer, where it is made, and how it can be cleaned. The CE marking must also be affixed to the label as, under current EU legislation, if toys do not have such a certificate, they cannot be sold in any member state of the European Union.
The packing of plush toys may be different depending on the company that makes them, but usually these baby products are placed individually in a plastic bag and then can be placed in a beautiful box or other packaging that will appeal to children as well as parents. There are quite a few manufacturers that offer plush toys in nylon packaging only so that children can see the toys inside.
We have just introduced to you the manufacturing stages that soft toy manufacturers undergo and it may seem like an impossible task for you to create such a toy yourself at home.
But, it's not that complicated to design and create a unique soft toy on your own. If you want to try making your own soft toy, all you need are the right materials, a toy sketch, and a sewing machine.
How To Make Plush Toys At Home?
Start with a little research
To make a couple of toys for your child, you do not need to do a detailed marketing research. But, if you want your little one to really enjoy the toy, it is a good idea to pay attention to the type of toys that excites them. This will make it easier to choose a model and minimise the time spend thinking about what toy to make.
Toy Design
Once you know what kind of soft toy you want to make, you can either search for the right models on the internet (there are quite a few), or if you are creative enough, you can use your imagination and create your own design entirely.
Sketch of the product
In order to start cutting and sewing the toy, you first need to make a paper cut out from the sketch you drew.
Materials and accessories
For the outer layer of the soft toy, you can use some beautiful plush fabric or textile. If you have nothing handy, you can also use fabric from any of your old clothes that don’t wear anymore.
You also have enough options for stuffing, but our advice is to opt for synthetic materials as they:
● Do not absorb moisture and odours
● Do not cause allergies
● Toys filled with synthetic materials can be cleaned very easily
Cutting and sewing
To cut the toy components, you must first place the pre-cut pattern on the fabric, outline it with chalk, and then carefully trim the components. For sewing, you will need a sewing machine and the skills to use it. If you can sew, you can easily join the components of the toy. Just make sure you leave a little space unstitched, as this is where you need to fill the toy with the stuffing that you have prepared in advance.
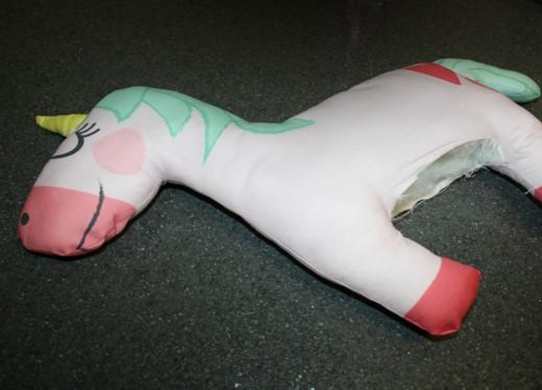
Filling and adding accessories
Filling is not difficult, you just take the filling material and fill the toy evenly through the hole you left while sewing. Once you put the filling in, you sew the hole and you're in the final stage. Additional accessories such as eyes, hair, mouth, and others can either be cut from another type of fabric and glued to a plush toy or sewed (embroidered).
Before gifting your child with a home-made plush toy, inspect the product carefully, make sure the stitches are firm and straight and that you have not forgotten any other details.
Categories
Video tips from pediatric pediatricians